Getting Started
Minus the complexity
Simply C2 Set-up Guide: Registration and setting Up
Simply C2 Set-up Guide: Registration and setting Up

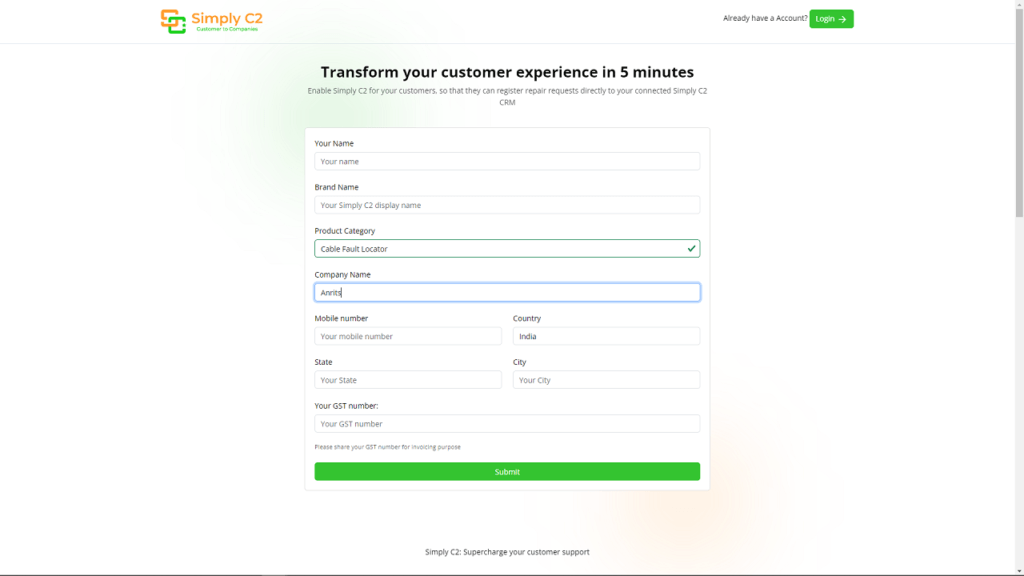
After you get your email verified in the previous step, this is where you come.
Remember, brand name could be different from your company name. For example, our company name is Anwesha CRM Pvt Ltd whereas our brands are Saleswah CRM and Simply C2.
If you are not in India or you do not need to claim GST credit later, you can ignore the GST number field.
Check all information in the page; because after you click submit, your account will be created. And, much of the information that you enter here will be used in your Simply C2 Set-Up.

Go tthough these steps one by one for Simply C2 set-up. Don’t worry; some of them take less than a minute.

In this first step of Simply C2 Set-Up, you will probably find most of the information pre-filled from the pre-registration step. Make changes, if at all necessary, and proceed to the next step.
Remember: the GST number is useful to send estimates and invoices later to your customers. So, do fill that in if you have any interest in invoicing your clients later. Also, please use a mobile number that you use with WhatsApp. We can send you alerts (only strictly necessary ones) over WhatsApp.

In the second step, you will need to select your service model. Do you provide customer support at their location or do you expect the customers to come to your service centres?
Don’t skip this. We configure Simply C2 at a fundamendal level based on your input here.

The step 3 is perhaps the most critical in the entire Simply C2 set-up flow. In this step you will add products that you wish to provide service for.
If you have only a handful that you need to add, you can add them one by one. If however your product list is long, then please use the import product list utility.

In the fourth step, connect with Google Workspace or Microsoft Office 365.
Why? Because this will help you download your contact list from your address book. You can also start emailing repair estimates or invoices from your company email address.

In the fifth step, it’s time to add your users and activate them.
If your account type is Starter/ Basic, then 30 lifetime free licenses are available for your use. These will be available so long as
If however, your account type is Premium, then you can skip this page. You can go to user/ license management and add/ assign users.

Congratulations! You have performed the basic set-up to be able to accept customer complaints, assign it to your users and follow up to close the tickets.
Now, it’s time to let your customers know about this new channel for them to log complaints.

In case you need any help, please email us at simply@simplyc2.com or leave a message through the web form at our Contact Us page.